Archive | July, 2011

Whoopie!

31 Jul

Last week I asked for ideas for my next cookie. And then….I made my next dessert before I checked the comments :/ Sorry Jess! I see that you ended up giving a suggestion, so I’ll keep that in mind. But I did still make something that’s a cookie. Kind of. It’s kind of a cake. And kind of a sandwich. It’s a whoopie pie! I’ve just recently heard of these, and to be honest I was s little skeptical. Let’s face it. The name is slightly ridiculous. But I thought I’d give them a try anyways. They looked fun and I found a recipe from my favorite website of all time, bakerella.com  There are lots of flavor variations to choose from, but I liked her suggestion of chocolate with peanut butter filling.

The dough starts with the usual suspects: flour, cocoa powder, baking soda, and salt sifted together. I usually give mine a quick whisk after I sift them just to make sure I get all of the lumps out.

Then you have to beat together the other ingredients for the dough: butter, brown sugar, shortening, egg, and vanilla. Once it’s all combined you can add the flour mixture and some milk to it. It makes a batter that smells similar to brownies.

This will be dropped onto a baking sheet by the tablespoon, and it’s important to leave a little room for them to spread. And equally important to line the baking sheet with parchment paper. Don’t forget that step. Let’s not all learn the hard way. 🙂

While these were in the oven I started making the filling. It starts with peanut butter and butter being creamed together.

Then it becomes fluffier and even sweeter when you add in the powdered sugar. 🙂 The only thing I changed in this recipe was the salt. It called for 1/2 tsp of salt to get added along with the sugar, but I cut it down to 1/4 tsp. It just seemed like too much salt to me. I didn’t want all of the sweetness from that powdered sugar to be cancelled out.

The next step is to try NOT to eat the filling by the spoonful while the cookies are cooling. It’s a hard one, but you must try. Once they are cool, you can fill them with a spoon. I decided to fill them with a piping bag instead. It’s just more fun that way. 🙂 But if you don’t have one it’s not at all necessary.

Once you add some filling to a cookie and press another cookie on top, you can leave it as is. Or, you can dress it up a little. Fun times. 🙂 You can add anything you like, such as: chocolate chips, peanut butter morsels, sprinkles, and chocolate sprinkles.

I think my favorite were the rainbow colored sprinkles. They just looked all dressed up, like they were ready for a party.

Another good thing about accessorizing your whoopie pies is that you can make them educational. Such as, a way to teach patterns.

Ok class, look for the pattern. Chocolate chips, sprinkles, plain,… chocolate chips, sprinkles, plain,… which one comes next?

Or if you don’t want to work your brain while enjoying your whoopie pies, just pile them on a platter and dig in. 🙂

I’m still not quite sure how to describe these things. Even though they look like a cream filled sandwich cookie, the texture really is more of a cake than a cookie. I’ve never had an Oreo Cakester, but I’m starting to wonder if this is what they taste like?

Next Up: Probably a variation of cakepops. A variation that I predict will be very popular.

Random Thought of the Day: It’s time for back to school shopping. As a kid, what was your favorite thing to get at the start of a new school year? A new backpack? A box of new crayons? Clothes? Folders with your favorite cartoon character? Post a comment to let me know  🙂

Chocolate Mint Thumbprints

21 Jul

Chocolate and mint just go together so well that I keep looking for new recipes with this flavor combo. I’m also currently looking for new cookie recipes because I don’t have many cookies that I can make from scratch. While looking for new cookie ideas I picked this recipe to try because I’ve never made thumbprints before. I thought they would be fun to make, and I figured that if all else failed I could always eat the leftover Andes bars that I needed to buy to make these. 🙂 They are just so small and cute and delicious that I could see myself eating a couple dozen at a time. Does anyone else feel this drawn to the little Andes bars? No? Just me?

Here’s how it goes…

In a microwave-safe bowl, melt the bittersweet and mint chocolates at 30 second intervals until nearly melted. Whisk until smooth, then let cool.

In a medium bowl, whisk the flour with the cocoa and salt.

In the bowl of a standing electric mixer fitted with the paddle, beat the butter until creamy.

Add the granulated sugar and brown sugar and beat at medium-high speed until light and fluffy, about 3 minutes. Beat in egg yolks and vanilla. Scrape the chocolate into the mixer and beat just until incorporated. Add the dry ingredients and beat on low speed, scraping down the sides of the bowl occasionally, until smooth.

Transfer the dough to a sheet of plastic wrap and pat it into a 7″ disc. Wrap and refrigerate until well-chilled, at least one hour.

Preheat oven to 350 and position racks on upper and lower thirds of oven.

Line 2 cookie sheets with parchment paper. Spread the Turbinado sugar in a shallow dish. Scoop up tbsps. of dough and roll into balls, then roll in the sugar and place on cookie sheets.

 Use your thumb to make an indentation in the middle of each cookie. This is the fun part. 🙂

Bake for 10 minutes, until slightly firm. Remove from oven. Using a melon-baller, press center of cookies again. Return to oven, shifting the cookie sheets and bake for 5 more minutes, just until dry but not hard. Transfer cookie sheets to racks to cool completely.

Put the white chocolate in a heatproof cup. Put the cream into a microwave-safe bowl and microwave on high power until boiling, about 30 seconds. Pour the hot cream over the white chocolate and let stand until melted, then whisk until smooth. Stir in peppermint extract. This is the part where I forgot to take a picture.

Fill center of cooled cookies with white chocolate mixture and refrigerate until set, about 30 minutes. Store in airtight container for up to 1 week. This is the part where you decide that you want to make these cookies too, because they just look so darn delicious.

Up Next: What kind of cookie should I try next??? It has to be something interesting. 🙂

Random Thought of the Day: The 7 Habits of Highly Effective People. Bleh. I think the first thing I should do to be effective with my time is not read this book. I’m supposed to be reading it over the summer, and I’m making an honest attempt at it. But I’ve been working on it little by little for over a month now and it never takes me a month to finish a book!

More adventures with gumpaste flowers :)

16 Jul

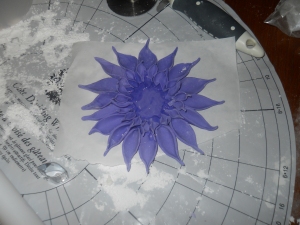
Several months ago I saw a tutorial online for how to make a dahlia out of gumpaste. I’ve always thought it is a very pretty flower, and that made me want to try to make one. The tutorial said that it should take about 15 minutes to make. Hahahaha. That was the funniest thing I’d read all day. Seriously. It took me over an hour, but in the end I was happy with how it turned out. I think I’ll even make another one some day. 🙂

I decided that since the dahlia would turn out to be quite a large flower, it should be the main focus of the cake design. I wanted the rest of the cake to be fairly simple, so I needed a good color combination to showcase this flower. My second favorite color is purple, and I’ve always thought that different shades of purple look nice together. I decided on a lavender-ish color for the cake and a deeper purple for the flower. I started by baking chocolate cake layers. I cut each layer in half before I added the icing so that instead of a 2 layer cake, it was 4 layers. That way it looked all pretty inside when it was sliced. 😀 Then I covered the cake with homemade marshmallow fondant.

This stuff is so easy to work with and I LOVE it. I haven’t had enough practice covering cakes with fondant, but you would really never guess if you saw how smooth this cake looked. I highly recommend this marshmallow fondant over the store bought fondant. Not only is it easier to work with, but it also has a better flavor.

The first step in making the dahlia was to cut out a circle with a cookie cutter, and then make an impression inside that circle with a smaller cookie cutter. This was just to serve as a guide, to help make sure that all of the petals would be spaced evenly.

Then came the time-consuming part. Not necessarily very difficult, just time-consuming. For each and every petal I had to: cut out the petal shape, roll it with a fondant tool to get it thinner, pinch each end of the petal, and then place it onto the flower. The first couple of rows took the longest since they had the most petals.

As I added more and more petals, I could really start to see the flower coming together. The last couple of rows needed really small petals so I had to cut them down even after I’d used my smallest petal cookie cutter. I was happy with the final product! Here’s mine and a picture of a real dahlia for comparison. I’d say the tutorial I found helped a LOT since this was the first time I’d even attempted this flower. I’m so glad that people who know what they are doing take the time to write those things so that people like me can learn from them (instead of learn the hard way). 😀


While the flower was drying I had some time to add a border to the cake. Then I just had to make a quick green petal and place the flower on top. All done!

Up Next: Maybe I’ll actually post the chocolate mint thumbprints that I mentioned last week. I forgot that I’d already mentioned those until after I started uploading these pictures. 🙂

Random Thought of the Day: Has anyone ever tried paddle boarding? I am going to try it with a friend of mine in a couple of weeks. We are going to be athletic and adventurous 😉 If any one has any tips be sure to send them my way!

Spa Party Cakepops :)

9 Jul

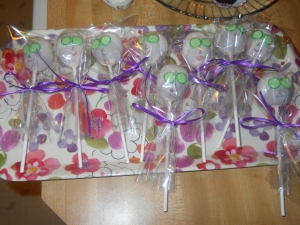
As requested by many of my thousands of fans (haha) I am posting the spa party cakepops today. 🙂 I was very proud of these because they were one of my original ideas. 🙂 My friend who was hosting the spa party asked me to bring cakepops, and of course I said I’d love to. But she didn’t ask for any specific decorations, so I started thinking of what would be good for a spa party. Then it just came to me the next day while I was walking my dog. What better way to say “spa!” than to make cake pop people that are wearing a towel around their heads and have cucumbers over their eyes? *I do realize that it sounds slightly disturbing. It turns out kind of cute in the end. If you’re unsure, just scroll to the bottom* 🙂

These were actually very easy to make. I followed the basic directions for making cake pops on bakerella.com, but I rolled them into an oval shape rather than perfectly round. Then I dipped them into what I intended to be a skin colored white chocolate. It looked like a good color to me right when I mixed it together, but as it started to dry I realized it was way to light. It looked almost white. Next time I’ll know to add more food coloring, but these worked ok.

Then I dipped the top part of the pop into white chocolate twice (at opposite angles) to make it look like there was a towel wrapped around it.

The last step was to use some jumbo sprinkles and my food coloring markers to add facial expressions.

There you have it! An entire crew of cakepops getting relaxed and beautiful 😉

So I guess the real question is: which turned out cuter? The pops, or us? Vote in the comment section 😀

Up Next: I think it will be some chocolate mint thumbprint cookies 🙂
Random Thought of the Day: I went to Target today and saw the beginnings of their back to school display. Bittersweet. In one way I love to see lots of Crayola crayons 🙂 (No RoseArt!!!) In another way, I’m really enjoying my summer. Not ready to buy school supplies just yet.

The End.

Happy 4th of July!

3 Jul

I’ve been waiting to make this cake for an entire year! Last year just after the 4th of July I saw a cake online that absolutely made me drool. I knew I wanted to try to copy it, and then spent about an hour searching the internet for how to even bake the darn thing. It looked complicated, but I was determined that I would pull it off. That being said, I clearly can’t take any credit for this design. I am not nearly creative enough to dream up something like this.

Anyways, let me show you how to pull off this kind of magic.  🙂 Start by baking a red velvet cake and a white cake. Then cut into very thin layers (as thin as you can get). Stack them alternately, with a thin layer of cool whip between layers. The goal is to get 13 total layers. I ended up with 11. (Close enough). My sister’s genius idea of putting the thin layers of cake in the freezer for a bit before stacking them was a big help. That way, when flipping these teeny slices of the cake onto each other they weren’t so delicate. Thanks Jess!

After all the hard work of stacking those together, you actually  have to cut part of it off. 🙂 I took a very small round cake pan (4 inches in diameter) and placed it on top of my cake. I centered it as best as I could, and then cut all around it. You want to leave the center 4 inches intact, but cut away the outside rim.

That was totally confusing to describe. I hope the picture made more sense than my rambling did. Now, rewind to the baking part. In addition to the white and red velvet cake, you also must bake one more white cake. But this time, add blue coloring to the batter before sticking it in the oven. Do you see where I’m going with this? 😀 Take the same small round cake pan and place it on top of the blue cake layer. This time, cut out the center portion and leave the outside intact. Basically, you are cutting away the middle to make your blue cake layer look like a blue donut. Then, carefully place this blue cake ring around the red and white cake that has already been carved out.

Now all of the behind the scenes work is done. Time to frost and decorate. Jess also had a great idea of how to decorate this cake, but by the time I got to this point I was running short on time and icing. I figured I better find something quick so that I wasn’t still frosting the cake when my guests arrived. I decided on a cake stencil that I haven’t used in over a year and forgot that I even had. I thought the design looked a little like fireworks, so I thought it would be appropriate. Unfortunately I was out of blue sprinkles, so I had to use only red. But it worked out pretty well. 🙂

Here’s where the fun part starts with this cake. Time to slice! (And cross your fingers that everything is stacked like it should be on the inside. I was very nervous to cut into this and see if it really worked!)


Yes! It worked! It was worth all that time I spent reading and re-reading the instructions for this until I finally figured out how to do it.  🙂

Random Thought of the Day: Not so random, but of course this post is for anyone who is serving or has served in the armed forces. We would not have a holiday to celebrate tomorrow if it weren’t for all of the sacrifices you make. Thank you for doing what you do, even though we don’t recognize you for it nearly enough. Also, thanks to all of the families of those in the military. You rock.

Up Next: I’ll be sharing some cakepops that I made this past week. They were pretty cute, almost as cute as the friends I made them for. 🙂 They will have to wait until next week to make an appearance here, since the flag cake was more urgent. :p